Monday, September 28, 2009

Coffee Pots

Not many potters make coffee pots. Maybe it's because coffee pots are too complicated. Heat needed at the bottom, perking or dripping the water through, the grounds problem, etc.

Maybe it's because coffee is never (well, hardly ever) moved from the pot that made it.

This is an experimental pot I made just to explore the form. It would work for hot syrup just as well as for one or two cups of coffee, I suppose. Not that a coffee shaped clay piece couldn't be used for tea, mind you.


The exercise got me thinking about coffee pots in general.


Did you know that Chemex® still makes that famous glass drip pot to this day?
(www.chemexcoffeemaker.com)

They now make one without the wooden/leather collar that has a glass handle. Not the funky look, but more practical.

If you wished, I suppose it would be possible to make a pottery one, but then, there's much to be said about watching the coffee being made in glass.


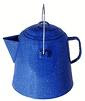
What, in our collective Western minds, distinguishes a coffee pot from a tea pot? The shape.

Coffee pots are nearly always tall with a spout located at the top. Maybe this is because of the need to keep any stray grounds as far away from the liquid as possible.

The original design probably came with the beans from the Arab and African world into Europe. An Arab pot, which is invariably made of brass or other metal has a heavy bottom (for sitting down on sand) and a weighted, hinged lid.

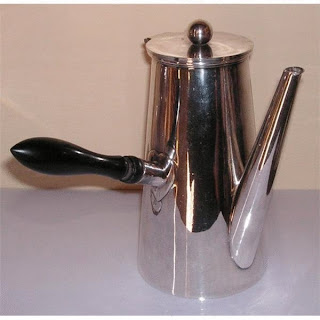
The exception to this is the silver maker's designs which placed a long, S-curved spout on the the coffee component of a silver set. Coffee and tea being served in this manner is always brewed elsewhere and put into the pot. So there's no actual brewing going on here. There were some electric percolators that had a similar design as the silver serving set pot, but that was because we were so in love with everything electric. The design soon died when better coffee could be made in makers like the ones we use today.


Silver chocolate pots often followed the shape of coffee pots, but has the spout or handle, whichever way you want to look at it, offset chocolate offset to one side, signifying it is a chocolate pot. This would seem to be a most awkward way to serve.

During the Victorian era, Limoges and other French and European china makers, as well as Japanese makers, produced chocolate sets that were elongated with the pouring spout located at the top. Most confusing.

I would imagine cleaning congealed chocolate out of an S-shaped spout could be a bit of a drag.

The pots seemed to take on the shape of the fashionable ladies silhouette--that of the 'Gibson Girl' who lost her bustle, gained a slim waist and wore elongated, non-hooped dresses.

Saturday, September 26, 2009

Round Answers Round

Round forms make great flower vases. And they are fun to throw on the wheel.


Putting a good lid on a very round form is another matter altogether.


"The Bishop" is a small piece with a totally experimental lid. It may not look it, but this lid really works well as far as ease of grasp and access to the jar. It has a flange inside.

It can be difficult to find a distinctive lid that holds it's own with the form, yet relates to it in design.


This is a fairly unassuming lid on this brown teapot, but then there's a lot of 'round' going on above it.

Same with the large green basket.

I like to see a lot of 'air' in the negative space. It makes you feel you can slip your hand inside the space with no problems.

Relating the curve of a handle with a very round vessel is another design consideration--you want the negative space to be neither too large or too small and to relate well to the roundness of the pot.


Sending Digitals to Juries

I've been involved in lots of shows juries over the years. One of the biggest jobs involving shows is keeping all the entries sorted.
Even within strict parameter rules for entry, things come to jury committees in many forms and one must be meticulous about handling all the material. Some work gets submitted in the most appalling manner.
When you send digital entries, be sure to label the CD exactly as they request. And, as mentioned previously, be sure to use a special pen for writing on disks. If no special format is requested, I always do this anyway. Your name, the show or entry title, the date and any other brief information is enough.
In addition, I compose a paper thumbnail label with the same information to slip inside the jewelbox. Then I make a large CD label that fits into the front of the box.
Most printers will do CD label sizes. If not, figure out the size, print it off and cut with scissors to fit.
The name of the show, your name, mailing address (omitted in the example), phone number and email address and any other information that might be needed should go on the label. If there is any question about your entry, it will be easy for the show committee to get in contact. Your job is to make it as easy as possible to for the jury and committee. Choose a regular disk--not the more expensive read/write kind for your submission.
Don't send a huge, gazillion-pixel image. Stay within the image size they request. They don't want to have to fiddle with your entry. They don't have the time or possibly the computer capacity to handle huge shots.

Tuesday, September 22, 2009

iPhoto 8.1

There's a big difference between the old iPhoto and the newer edition. I prefer the old version. It's Edit mode was far easier to initiate; the new program requires extra steps. Not a big thing for one or two shots, but if you are processing a large collection, it can get a bit irritating.

The new iPhoto also seems awkward and dumbed down. With the old program, it was as if you were working with both hands; the new iPhoto's like working it with one hand behind the back.

You can't adjust the size and volume of images with as much ease. The bottom window must be moved out of the way to access the bottom corners of the 'crop' function. The straightening feature is nice. There is a 'balance scale' at the bottom of the image and a light grid for lining up the verticals in a shot. But be sure you straighten the photo before you crop it. Otherwise, you must go backward to access it.And will revert to the older version of the window if you crop first, then decide to straighten or level the shot. So you must return to crop and do that function again. Level first, then crop.


It is more difficult to access the data on size. With the older program, that information was available when you cropped and saved the image. With the new program, it isn't as forthcoming.

What I DO like in the new iPhoto is the capability to alter the overall image without going to Photoshop or another program. It's built right in and has a pretty good range.

At least enough for private family photos. You can lighten the exposure, 'warm up or cool down' the color, change the tint. That's really nice when working with old slides that have gone a bit blue with age or shots that were taken with too much or not enough light. I've been able to rehabilitate some old slides that would have been lost.

As far as slides of your work are concerned, it is my understanding that publications like Ceramics Monthly, Pottery Illustrated, etc. and some show juries and publishing editors will reject a slide outright if they see it has been processed through Photoshop or any other editing program.

Some people have told me the marking can removed, but frankly, that's just too much trouble for me. Better to take a really good slide in the first place. And if that's beyond your reach, get a set of good pro slides done.

Monday, September 21, 2009

Images-From Camera to Disk

When taking digital shots, I like to select the setting that will allow the largest format the camera will permit.

For instance, my camera is a Cannon Power Shot SD500. It can take Super Fine photos, but the video card will only hold 78 exposures. For Fine, I can get 125 shots. (By the way, you can also store a limited amount of stuff on a video card, though that could get pretty 'spendy.)

With most image handling computer programs, you can control the size of the export for storage. I like to store rather large images initially. You can always reduce them, but you sure can't make them bigger once they're reduced.

Storage disks with the largest memory are perfect for back-up. You can download a single image onto your computer without eating up too much memory.

I try to remember to print off at least one full-page color print of the image and file it away in a binder notebook as a portfolio page.

I label each disk and store in a crystal case. Make sure there's a good label or thumbnail shots of what is stored on the disk.

If you do this routinely, you will be prepared for whatever call for entry or request for work pictures that comes your way. And you'll also save yourself some 'digging time' trying to locate examples of your work.

Wednesday, September 16, 2009

Image Archive: Storage and Management

This whole image-managing stuff started with the need to organize some photos a show entry.
When I got a new laptop computer earlier this year, I kept the bulk of my work slides on the old Mac G4. "I'll just leave them there and pick out what I need when I need to." I told myself.
And it worked just fine--for a while.
Then I took some new work pictures. So, the questions came up: Do I load them into the old G4? Put them in the new laptop? How will I keep track of what's new and where?
Makes more sense to put them in the new computer for easier access, right?......... I needed to take a new look at how they were organized into categories and folders. Maybe I could rearrange them in a better way.
I made new folders labeled "Teapots, Drinking Vessels, Plates and Platters, Sculpture, 2-Dimentional", etc., sorted the old jpegs, attached them to emails and sent them in groups of 3 to the new computer.
This works because I have two email accounts. I can send using one email account from my local provider to the other email account. Though I'm guessing it could work using the same address for both (?) because the two computers have different numerical addresses. (This is the method I used to transfer as-needed digitals anyway, so now I will only do it once and have a better sorting system to boot.) Beside that, I'll keep the old library on the old G4 as one form of back-up.
I also made backup files and burned them onto disks for additional insurance in case the old G4 decides to go BJORK. I used a special pen for notation on disks, but I don't t like writing directly on the the backside. Just to be safe, I write the information I need to know on the clear, inner part of the disk. Noting the date is also a good idea--month and year will do.
I only use Read/Write discs just in case I want to rearrange things or need to add new images to the back-ups. (Haven't tried to do this yet, but it sounds like a good idea, anyway.)
Then, I began to think about all the old slides I had in binders........
and old family slides........

Saturday, September 12, 2009

Images and Slides

Entries into juried shows have, for the most part, converted the entry process from sending slides to sending a computer disk of entries.
So, some time ago, I purchased a Nikon Cool Scan V slide converter. I have binders of old pro and archive slides that needed converting and back-up.
So, these last few weeks, I've been hacking away at doing just that when I can get the time and the gumption. I really needed to get a better handle on accessing and managing my slides with new work images.
Add to that the purchase of a new laptop and the need to get everything in one place. The old images were still sitting on the G4 Mac. I needed them on the laptop and in a new catalog system for easier access. I also realized I needed to do the grunt work of putting ALL of the old and new digitals on back-up disks.
Let me tell you, it's tedious converting slides.
Each slide must be hand-fed into the scanner's maw, it's electronic digestion groans; you punch the "Scan" button on the computer screen, the scanner humms and haws, making it sound like it's grinding up the slide within. It then ups the musical scale to let you know it has swallowed the image and is digesting.......Then, when you request the image delivery, it sings and whines and dumps it to the desktop.
It's like feeding baby food to an 8-month-old and dealing with the result. (Meaning there's more work ahead managing the image within a program like iPhoto.)
You push a scanner button to punch out the old slide--it even has something to say about THAT.
What a Prima Donna.
On the whole, the process is slow and boring as hell.
Who knew this could get so complicated! And you thought making art was just making art.
"HA", the Gods say, "HA!"

Tuesday, September 8, 2009

Preoccupations

I've been spending a lot of time lately processing peaches. We have a wonderful "frost peach" tree growing alongside our entry way that, this year at least, has decided to share it's bounty in abundance.

It bloomed like crazy in the spring giving us a waft of perfume and a visual treat every time we went in and out. The carpenter ants attacked it and my husband sprayed and covered the tree-wound with a protective strip of metal. I cropped back what my grandfather used to refer to as "water sprouts" when they appeared. When the blossoms cascaded down to be replaced with downy oval fruit starts, I thinned them out. I think now I should have been even more severe.


Every day for the past few weeks, we have gone out to collect the fruit before it falls to the ground. The result has been overflowing bowls of nearly-perfect to perfect peaches.

I have put up jars of pickled peaches, jars of peaches for future pies and desert, and jars and more jars of peach jam. We have given bags away. We've eaten them almost every day in one form or another. We are nearing the burn-out state fast.

Come fall, we will crop the limbs back severely to protect the tree from it's own enthusiasm. And I'll be sure to thin even more when the fruit starts appears again.


Beside the peach crop, we have harvested blueberries, rhubarb and now, hopefully the elderberry bushes will produce enough of that precious fruit for my private reserve of jelly. We hope for enough tomatoes to put up a few jars for winter eating.

So, for now, I must answer the garden and honor my own thrift.


Thursday, September 3, 2009

Right Brain/Left Brain Color Test


I love taking tests. Some people hate them, but I'm a sucker for them.

Here's one ,courtesy of my daughter-in-law, that give you a good idea of what your right brain and left brain tell you.

If you're left brained, you rely on "just the facts, ma'm". It's the timekeeper, the place where math smarts reside, the disciplinarian. The right brain is where all the fantasies, creative thought, the habitat of Muses. (Musi?)

This test asks you to select the color of the word, not the meaning of the word.

I suspect artists, musicians and craftsmen will find it easier than, say accountants, scientists, and folks that must work with cold hard facts.

www.humorsphere.com/fun/8787/colortest.swf

Have fun.

(P.S.) I did it in 2, but then, I had to get used to how fast four seconds are.
Excuses, excuses.

Here's another site for left brain/right brain:
www.intelliscript.net/test_area/questionnaire/questionnaire.cgi?q=right_brain_left_brain_2

So, can you visualize a transparent cube in your mind? Then make it tumble?

Can you recall complex music and replay it in your mind?

Can you visualize your next project in virtual reality; looking at it from all sides, the bottom or the bird's eye view?


A Totally Useless Random Fact: Did you know you have to use both sides of your brain to sing a melody and lyrics?